Wednesday, October 30, 2013

Pasta with Turkey Sausage & Peas

Wow that was a long break! Not quite sure why it was so long, but I do know that it was much needed. Anyways, I am here now to share recipes with all of you!

My son, now 11 months, is eating pretty much what I eat. Which is great, but I am constantly having to make recipes that are healthy and nutritious. This is great for my own well being as well, but not as easy as I thought. Not only do I have to think of ways to include vegetables in our meals (salads wont work for a little babe), but I also think I have spoiled my son a little bit. For instance, he prefers his broccoli roasted and his peppers roasted while mixed in with goat cheese. Seriously? I know, way more advanced than I was at his age!

So getting back to the cooking part. As a family, we all enjoy a dish that I make, pasta with turkey sausage and peas. It's simple and a recipe that you don't really need to do any measuring. Cooking, just the way I like it. Enjoy!

Pasta with Turkey Sausage & Peas
Serves 4
Ingredients -
4 tablespoons olive oil
1 pound (4 links) ground turkey sausage, removed from casing
Sea salt and freshly ground black pepper
2 cups frozen peas
1 pound any kind of pasta 
1/2 cup grated Parmesan cheese

Directions -

In a large pot, bring 6 quarts of salted water to a boil.
Once boiling, add the pasta and cook according to directions on the box. 
Drain pasta, but reserve 1/2 cup of pasta water.

Meanwhile, in a saute pan over medium heat, add 2 tablespoons of olive oil.
Add the sausage and saute until cook through and browned.
Once the pasta has only a few minutes left to boil, add the frozen peas to the sausage and saute for about three more minutes. 
Once the pasta is drained, place it in a large bowl.
Pour the turkey sausage and pea mixture on top.
Add the pasta water and 2 tablespoons of olive oil.
Mix all together.
Sprinkle sea salt, freshly ground pepper, and the parmesan cheese on top.

So simple, yet so tasty! The sea salt really tastes great in pasta dishes. Add a little more if you wish!
 *Adapted and simplified from Giada's Recipe.


Sunday, May 19, 2013

BBQ Chicken Sandwiches

Hello All! It has been quite awhile since I last wrote a post! I really have been unmotivated to make anything new with this gloomy Wisconsin weather, but finally there has been some sunshine. Once the sun is shining, I like to bring out the grill! 

A few days ago I made these amazing BBQ chicken sandwiches with melted gruyere cheese. I love a tangy BBQ sauce made with vinegar and dijon mustard. I have yet to find really good bottled BBQ sauce (without high fructose corn syrup), which is fine since this homemade sauce was so easy to make and delicious. 

Alright, let me tell you about these sandwiches! The chicken was grilled and juicy - perfect. They were messy, which I think is a requirement for a tasty sandwich. The sauce was so good, that I kept dipping my sandwich in it. I melted gruyere cheese on top, which is similar to swiss cheese, but you can put any or no cheese on top if you like. I toasted a whole wheat bun and added a tomato. Obviously, you can add any toppings that you would like. Make sure you save your leftover BBQ sauce to dip your sandwiches in. Next time I make this, I plan on doubling the BBQ sauce recipe and putting half of it in a mason jar to keep handy in my fridge. Please make these sandwiches, you will regret it if you don't!

BBQ Chicken Sandwiches
(makes 4 sandwiches)

Ingredients -
1 tablespoon olive oil
4 skinless boneless chicken breasts
4 hamburger buns toasted
1 tomato
4 slices gruyere cheese (or any cheese)
1 cup ketchup
1 tablespoon apple cider vinegar
1 tablespoon molasses
2 tablespoons brown sugar
2 cloves of minced garlic
2 tablespoons dijon mustard
2 tablespoons worcestershire sauce
Salt & freshly ground pepper to taste

Put the chicken breasts in a glass baking dish and rub in the olive oil. Sprinkle with salt and pepper. In a medium size bowl, combine all of the ingredients from ketchup to the worcestershire sauce and give it a good stir. Pour some of the BBQ sauce on top of the chicken and let it marinate for at least 30 minutes. 

When ready to eat, start the grill to medium heat. Place the chicken breasts on the grill and cook for 6 minutes on each side or until fully cooked. When turning to the second side, add some more BBQ sauce. At the last minute add the cheese and let it melt. Assemble your sandwiches to your liking.

Enjoy and happy grilling!

BBQ Chicken Sandwich


Thursday, March 28, 2013

Grilled Turkey Burgers


Last weekend, despite the not-so spring-like weather, we brought out the grill! And I am glad that we did because I made these delicious turkey burgers. I stopped eating beef almost four years ago now and I don’t even miss it. Turkey burgers can end up being really dry, but by adding yogurt and mustard, they can turn out moist. Here is my version of the turkey burger. Bring out that grill this weekend and enjoy these awesome burgers. Serve with a pickle and a Spotted Cow!

Ingredients:
1 ½ pounds ground turkey
2 tbsp plain low fat yogurt
2 tsp worcestershire sauce
2 tbsp grainy mustard
1 tsp Kosher salt
Freshly ground pepper
4 hamburger buns (toasted)
Olive oil

Instructions:
Put some olive oil on a paper towel and rub it onto the grates on the grill to prevent sticking.
Preheat grill to medium-high.
In a large bowl place the turkey, the yogurt, worcestershire sauce, mustard, salt, and pepper.
Mix together with your hands. Since these burgers are wetter than beef burgers, put some oil on your hands before you start mixing.
Divide the mixture evenly into 4 sections and form meatballs and then flatten them out. Don’t flatten them too much, but don’t make them too thick since they need to be cooked all the way through.
Grill on one side for 6 minutes and then flip and grill for another 8-10 minutes.

For Serving:
Avocado (Squeese some lemon juice on it to prevent browning)
Lettuce (I used Bibb)
Tomato with salt and pepper sprinkled on it
Aioli

Aioli Recipe – In a small bowl, whisk 3 tbsp good mayo (I used Hellman’s with olive oil), 1 minced garlic clove, ¼ tsp Kosher salt, and a few light squeezes from ½ a lemon. Slowly add and whisk about 3 tbsp of olive oil. Spread on the top burger bun. I love this stuff!

These make good leftovers too. Enjoy!


Recipe adapted from Food Network Kitchens: How to Boil Water

Thursday, March 14, 2013

Triple Chocolate Guinness Brownies & a Shamrock Shake


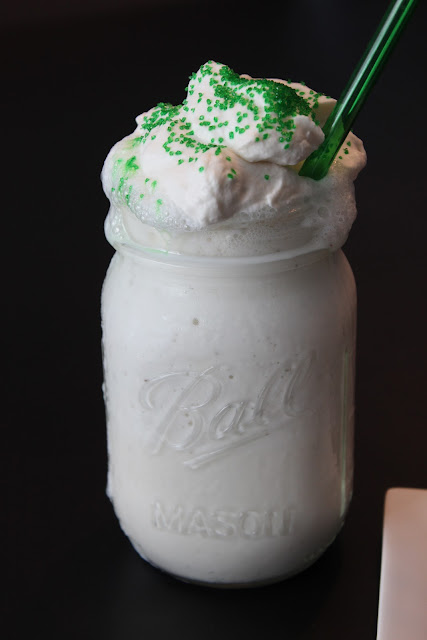
Since I wont be going out drinking this year at a local Irish pub wearing green beads, I thought that I could still have a little St. Patrick's Day fun with desserts! With all the blogs that I follow on Facebook, I happened to come across these two desserts that I thought would be perfect to celebrate St. Patty's Day. Warm triple chocolate Guinness brownies paired with a homemade Shamrock shake sounds perfect to me! By no means are these two recipes low fat, but every now and then it is ok to indulge, especially if it's homemade goodness.

   I found the recipe for Guinness brownies here. I don't even like Guinness, but having it mixed in with three different kinds of chocolate, I knew it would be good. And of course it was! I don't think things get any better than a freshly baked brownie. They also make your kitchen smell delicious! The only things that I changed with this recipe was that I used all-purpose flour and a 10 oz bag of dark chocolate and about 3/4 cup of the milk chocolate. I also melted the butter and chocolate in the microwave. I would stir the mixture every 30 seconds two times and then put it back in the the microwave for about 10 more seconds. Make sure you watch it so it doesn't burn and make sure you slowly add your chocolate mixture into the egg mixture or you could end up with scrambled eggs!

   I have never had a Shamrock shake from McDonald's, but I am sure they are great. Here is the recipe for a version that you can make at home with only a few ingredients. Very easy! If you want it a little thicker add more ice cream. I used Breyer's "half the fat" vanilla ice cream and 1% milk. I topped it with whipped cream and some green sprinkles. To make whipped cream you use an electric mixer to beat 1 cup heavy cream, 1 tablespoon sugar, and 1/2 teaspoon vanilla. It will take a few minutes.

Enjoy & Happy St. Patrick's Day!


Monday, March 11, 2013

Tomato & Goat Cheese Tarts - a little slice of heaven!

Goat Cheese - some people have tried it and some have not. Some people like it and some do not. I really enjoy it especially when it is baked between puff pastry and a large slice of tomato! Yup, you heard that right....Tomato & Goat Cheese Tart is what I'm talking about today.

This is Ina Garten's recipe, which you can find here, but I changed it up a bit. I didn't really change it, I just omitted a few ingredients to simplify it a bit. You can make this recipe as an appetizer, but I actually find eating two of them as a satisfying meal. Goat cheese has a smooth texture and tart flavor, so when you pair that with flaky puff pastry and a juicy tomato - the end result is amazing! So good!

Tomato & Goat Cheese Tart 
Makes 4

Ingredients:
1 Package of puff pastry (I like Pepperidge Farm) - DEFROSTED (You find it in the freezer section, so make sure you read the instructions on the back about defrosting)
3 TBSP Olive Oil
1 TSP Minced Garlic (I like prepared minced garlic in the jar, but you can also mince about 3 cloves)
4 oz. Garlic & Herb Goat Cheese (Comes in a log)
1 large Tomato cut into 4 slices
Parmesan Cheese (Grated)
Salt & Pepper (I prefer Kosher salt & freshly ground black pepper)

Directions:
Preheat the oven to 425 degrees.
Unfold a sheet of puff pastry on a cutting board (or a lightly floured surface) and roll it lightly to an 11 by 11-inch square. It does not have to be perfect. Using a 6-inch wide bowl or other round object as a guide, cut 2 circles from the sheet of puff pastry. Repeat with the second pastry sheet to make 4 circles in all. Place the pastry circles on 2 baking sheets lined with parchment paper. You can throw away the pastry scraps or form them into bread stick shapes and bake those too. Puff pastry is too good to throw away! 
Using a sharp knife, score a 1/4-inch-wide border around each pastry circle. Prick the pastry inside the scored lines with the tines of a fork.
Mix 3 TBSP olive oil with the minced garlic and spread that evenly on top of the pastry circle, staying inside the scored lines. I use a pastry brush to do this, but the back of a spoon would work too.

Next, crumble the goat cheese evenly among the pastry circles. Again staying within the scored lines.

Put one slice of tomato on top, then sprinkle some parmesan cheese, and top with salt and pepper.

Bake in the oven for 20-25 minutes until the puff pastry is brown. You may need to bake the bottom sheet longer if it didn't brown as well. 

Serve warm or at room temperature. I like them best at room temperature. Enjoy!

Tomato & Goat Cheese Tart


Wednesday, February 27, 2013

Guest Post Today & Easy Chicken Paillard with Layered Roasted Potatoes

My really good friend and amazing cook, Morgan, is going to guest post a recipe today! She has been cooking for a long time and it shows. She shared her recipe for chicken and potatoes...doesn't get much better than that! Enjoy :)
-----------------------------------------------------------------------------------------------------------------
Snow Day!

Thank you, Jaime for allowing me to guest post on your blog. This should be fun!

I was originally going to post my recipe for turkey and vegetable chili, but due to an opportunity to cook during a recent snow day in Milwaukee, I decided to tweak my plans. Being spontaneous in my cooking is more my style anyway. I will inform you that although I love recipes and I am a collector of cookbooks, I rarely follow a recipe. I usually will scan over them to get an idea and then create my own version. This is usually in an attempt to make it healthier or use what ingredients I have in the house. Due to today’s recent events (no work due to massive amounts of snow), I decided to create a menu based off staple ingredients I keep in the house.

The first item on the menu is a healthy version of scalloped potatoes. I am layering a combination of unpeeled sweet and russet potatoes for increased nutritional value and instead of cream, I am using chicken stock. I also added a few extra ingredients for a pop of flavor.

The main dish is my version of chicken paillard. In this version I am lightly coating thin boneless, skinless chicken breasts in panko bread crumbs. I will brown the chicken in olive oil before finishing it in an oven. This is a fast dish to prepare any night of the week. Yum. Let’s get started.

Layered Roasted Potatoes
Ingredients:
5 Russet Potatoes (scrubbed and thinly sliced, keep the skins on)
3 Sweet Potatoes (scrubbed and thinly sliced, keep the skins on)
1 Onion-small (thinly sliced)
4 Garlic Cloves (chopped finely)
1TBS Olive Oil
½ tsp Dried Thyme
½ cup Chicken Stock
Salt and Pepper to season

Preheat oven to 375. Combine all of above ingredients, except chicken stock into a large bowl. Toss to cover each potato with all ingredients. Layer potatoes, overlapping one over the other (a pattern is not necessary, be sporadic and have fun), in a shallow baking pan. Typically, 2 layers of potatoes, one on top of the other is achievable. Make sure all of the onions and garlic are covering the potatoes, and well distributed between the layers. Pour chicken stock alongside the pan to give the potatoes cooking liquid. Cover pan tightly with aluminum foil and bake for 1 hour at 375. After 1 hour, remove foil and bake for an additional 25-30 minutes. Just long enough to crisp up the top layer of potatoes. Remove from the oven. You may top with freshly grated parmesan cheese to give a bit of decadence, but this is optional. When you are in my kitchen however, cheese is never an option, it is a requirement. Enjoy!

Easy Chicken Paillard
Ingredients:
4 Boneless-Skinless Chicken Breasts (pound thin, creating an even thickness throughout)
3 Eggs (beaten)
3 TBS Water
2 cups Panko Bread Crumbs
½ tsp Dried Thyme
2-3 TBS Olive Oil
Salt and pepper to season

Preheat oven to 425. Pound chicken breast with meat tenderizer/rolling pin to desired thickness. Keep in mind the thinner the chicken the faster the cooking time. Pat chicken breasts very dry with paper towel. Season both sides of chicken breast with salt and pepper. Mix water and beaten eggs to create an egg wash in a shallow pan. Coat chicken in egg wash. Next, dredge chicken in panko bread crumbs to form a light layer. Set chicken aside for a few minutes while you prepare the pan. Make sure your hands and work services are disinfected to prevent cross contamination from the raw poultry. 

Heat olive oil to medium-high heat in a large shallow pan. I use a griddle pan and it works great. Be careful not to heat the oil too high to prevent smoking and burning. Place chicken in pan and quickly sear each side. The key is to only flip the chicken one time. Once the chicken is in the pan, leave it alone! Allow the crust to form. The chicken needs to brown for roughly 2-3 minutes. Flip once and cook for an additional 2-3 minutes on the other side. Once chicken is browned, place onto baking sheet and bake at 425 to finish cooking and keep chicken crisp. Roughly 6-8 minutes is all that should be needed. Again, this will depend on the thickness of your chicken. This often takes some practice, but once you get a feel for the cooking time, this process gets intuitive and much easier. The point is to cook the chicken just until done. No one likes a dried out piece of chicken. If you use a thermometer when you cook, I often do, I look for an internal cooking temperature of 160 degrees. Remember the chicken will continue to cook in the carry over process once removed from the oven. When done, you may serve with a simple arugula salad and a slice of lemon. Fast and easy!

I hope you enjoyed my impromptu cooking adventure. Maybe Jaime will invite me back in the future? Until then, happy cooking!

Peace,
Morgan

Potatoes tossed & layered - ready for the oven
Potatoes out of the oven
Browning the chicken

Layered Roasted Potatoes & Easy Chicken Paillard


Monday, February 25, 2013

My All Time Favorite Sugar Cookie Recipe

A good sugar cookie recipe is a must in my life and it took me quite awhile to find the perfect one. But I found it and that's all that matters now.  My search for the perfect sugar cookie is now over...yeah! 

I made these cookies for Christmas and again for Valentine's Day. I told myself that I was making these cookies for my husband's V-day gift, but who am I kidding....I really wanted them! I did share though :) Obviously these can be made anytime of the year and not just for holidays.

Not only are these cookies the best, they are easy and have a short ingredient list.

*You need to chill the dough for at least 4 hours before baking*
 
Ingredients:
1 cup unsalted butter (2 sticks) - room temperature
2/3 cup sugar
1 egg
1 teaspoon vanilla extract
1/2 teaspoon salt (I like to use Kosher salt - you can taste it more and it gives me that sweet and salty satisfaction that I really enjoy)
2 1/2 cups all-purpose flour

What you need to do....
  1. In a medium-sized bowl, cream the butter and sugar until light and fluffy.
  2. Mix in the egg.
  3. Mix in the vanilla, salt, and flour until well-combined.
  4. Cover and chill the dough for about four hours (I have froze the dough before too)
  5. Preheat oven to 350 F. 
  6. Roll out the cold dough on a lightly floured counter to about 1/4" thick (no need to break out your ruler) and cut with cookie cutters.
  7. Transfer cookies to cookie sheets lined with parchment paper
  8. Bake 8-10 minutes or until the edges just start to brown.
I believe that sugar cookies should be topped with a vanilla glaze. Not necessary, but for me it is. You can find the glaze recipe here ...http://bakedbree.com/sugar-cookie-glaze. I use vanilla extract instead of almond and I like my glaze a little thicker so I only added about 1/2 tablespoon of water.

 SO good, Enjoy! Now I just need to find the perfect chocolate chip cookie recipe....


Monday, February 18, 2013

My Valentine's Day Dinner at Home

This year I kept it really simple. I wanted to make something that required very minimum effort and that had only a few ingredients. This is what we ate and how you can make it at home....

Salmon -
Two 6 oz. pieces
1/2 Tablespoon Olive Oil
2 Tablespoons Whole Grain Mustard
Salt & Pepper
Sunny Paris seasoning (optional)

Place the salmon on a baking dish with foil.
Season with salt & pepper.
Top with the mustard.
I also added "Sunny Paris" seasoning from Penzey Spice - I love this stuff! I highly recommend it. 
Roast for 6 minutes.
Broil for 5-6 minutes until the top forms a nice crust.

I love this salmon recipe, so simple, but so delicious!

Hasselback Potatoes - 

Unfortunately these potatoes were good, but not as good as I hoped. Not really worth the effort, but I am glad I tried making it. They looked fancy!

Dark Chocolate Mousse - yes please :)
3/4 cup unsweetened bittersweet chocolate chunks
1/4 cup water
3 egg whites
1/4 cup sugar

Melt the  chocolate with 1/4 cup water in heavy small saucepan over low heat, whisking until smooth. Cool for  about 10 minutes.

Using electric mixer, beat egg whites in medium bowl to form soft peaks.
Gradually beat in 1/4 cup sugar. 
Pour cooled melted chocolate over egg whites and gently fold together. 
Divide mousse among 2-4 (depending on how much you want to divide it up) ramekins or small dishes.  
Chill at least 6 hours or overnight.

I added whipped cream to the top! With an electric mixer, beat 1 cup heavy cream, 1 tablespoon sugar, and 1/2 teaspoon vanilla extra until it looks like whipped cream. It will take a few minutes.

Enjoy!


Sunday, February 10, 2013

ONE pot meal of chicken & veggies - Perfect for a cold winter night!


My newest criteria for finding recipes nowadays includes one pot meals and incorporating vegetables so I don't have to make them on the side. I also want to start using my cookbooks more. I nicely organized them in my kitchen by color and realized that I really don't use them that much anymore. I am always looking on the internet, but I want to put an end to that since I have all of these great cookbooks already. They have recipes that I enjoy otherwise I never would have bought them, right?!

Anyways, I found the perfect recipe that is a one pot meal and filled with three different veggies...yeah! It was also in one of my "healthy" cookbooks called The Food You Crave by Ellie Krieger. Love her and her recipes! They might be healthy, but not unbearable and boring. I felt so good prepping this recipe since I had a pile of vegetables on my cutting board ready to be eaten!

The recipe is called Tuscan Roasted Chicken and Vegetables. Yum!

Ingredients:

6 Roma tomatoes - cut in quarters and seeded
3 medium zucchinis - cut in half and then into slices lengthwise
1 bulb of fennel cut into slices (watch video below if needed on how to cut fennel)
3 tablespoons of olive oil
3/4 teaspoon of salt
4 bone in chicken breasts with the skin removed (I removed the skin myself with scissors)
4 cloves of garlic minced (about 4 teaspoons)
1 teaspoon grated lemon zest
1 tablespoon fresh lemon juice (half a lemon - I put the other half in my ice water)
Pepper
1 teaspoon dried rosemary.


Preheat the oven to 375.
Put the tomatoes, zucchini, and fennel in a large baking dish. Toss with 2 tablespoons of olive oil and 1/4 teaspoon of salt.
Place the chicken in the baking dish with the vegetables.

In a small bowl, combine 1 tablespoon of olive oil, 1/2 teaspoon salt, the garlic, lemon zest, and lemon juice.
Rub the mixture on top of the chicken and season with pepper.

Roast in the oven for 30 minutes. 
Give the vegetables a stir and all the rosemary after the 30 min.
Put back in the oven for another 20-30 minutes until the chicken is cooked through.

That's it! A perfect meal for a cold winter night. Enjoy!

Here is the video I watched on how to cook fennel....http://www.youtube.com/watch?v=LW0OCAnBYq8.

Vegetables before they were cooked - beautiful!

Tuscan Roasted Chicken & Vegetables


Monday, January 28, 2013

Polenta - Have you tried it?

Polenta is one of my all time favorites! If you have not tried it, now is the time. If you don't know what polenta is, it is ground cornmeal and very similar to grits. This is the kind that I like to buy, http://www.bobsredmill.com/corn-grits_polenta.html. Just adding water to the polenta is not tasty, so don't try that, but you should try this.....http://joythebaker.com/2013/01/baked-polenta-with-tomato-and-basil/. Not only was the polenta delicious, but so was the tomato sauce. The combination of the two melted in my mouth! I am planning on using that recipe again for sure.

This polenta dish was SO good and SO easy. I made it when I was home alone with the baby and pretty much ate the whole thing, but decided it would be better if I had some for leftovers. I've always made polenta on the stove top, so I was really glad to find a recipe where you can bake it instead.

I also really enjoy Ina Garten's take on polenta and have made this delicious recipe as well, http://www.foodnetwork.com/recipes/ina-garten/creamy-parmesan-polenta-recipe/index.html. I skipped the creme fraiche, but maybe would add it next time.
 
Come and join my love for polenta and try one (or both) of these dishes! Enjoy!

P.S. I seemed to have misplaced the picture I have taken of this dish. I think it got mixed in with all of the baby pictures I have been taking :)


Tuesday, January 22, 2013

Orzo Vegetable Soup

I originally started this blog post by saying that I'm ready to lose this extra baby weight and eat super healthy all of the time, but I decided to take that part out just in case in a couple of weeks I post a cookie recipe!

Something that I really struggle with is making sure that I eat more vegetables. When going out to eat, it is easy, I just order a salad or a side of green beans, but at home I don't always feel motivated to go the extra step. So, with keeping that in mind, I am going to try harder to incorporate more veggies into my meals. One of the best ways to do that is to add it to what I am making, like putting spinach in my lasagna. I don't think I will go as far as adding black beans to brownies, but I did make this soup loaded with veggies. Here is the recipe for some good, warm vegetable soup....

What you  need:

2 Tablespoons olive oil
1 onion chopped
2 garlic cloves chopped
2 carrots peeled and chopped
1 zucchini chopped
4 cups vegetable broth
1 can of chopped tomatoes
1 can of chickpeas or any kind of beans
1 teaspoon dried oregano
1/2 cup orzo
sea salt
ground pepper

How to make it:

Using a large saucepan over medium heat, pour in the olive oil and then stir in the onion and garlic. Cover and simmer for 2 minutes.

Stir in the carrots and zucchini. Cover and let cook for another 5 minutes or so.

Pour in the vegetable broth, tomatoes, and chickpeas. Bring to a boil, then reduce the heat and let it simmer.

Stir in the dried oregano and orzo, season with salt and pepper, and continue to simmer for about 10 minutes or until the orzo looks fully cooked.

That's it! Super simple. No excuse not make this healthy soup. I have been eating it for lunch and it is deliciously satisfying. This is a perfect meal to make on a Sunday afternoon and put in individual containers to have for lunch during the work week. Enjoy!


Sunday, January 13, 2013

Homemade Granola Bars!

I've always wanted to make homemade granola bars, but assumed that they would just be a lot of work to make, so I always avoided the idea. Then I came across a recipe to make pumpkin butterscotch granola bars and after making them, they weren't hard to make at all! And they turned out way better than any granola bar from the grocery store. They were soft and chewy, just the way I like them. I even froze some for later and once thawed out, they still had that soft and chewy texture.

The nice thing about making homemade granola and granola bars, is that you can make them however you want. You can add ingredients or take away ingredients based on your liking.

Here is the recipe that I used...http://www.heatherchristo.com/cooks/2012/10/11/pumpkin-butterscotch-granola-bars/. I used canola oil instead of vegetable oil and I skipped the almonds due to a nut allergy in the house. Next time I think I will add some ground flax seeds for an added healthy boost. I will definitely be making these again soon. Enjoy!


Monday, January 7, 2013

Toasted bread, ham, Dijon mustard, & melted cheese all in one bite!

I have already talked about one of my favorite sandwiches, the croque monsieur....ham, melted cheese, Dijon mustard.....you get the point as to why it's a fav of mine. Well I decided to make the croque madame, the same sandwich, but just open-faced.

Here's what you'll need....

4 slices of bread (I bought a loaf of crusty whole wheat bread and cut off slices)
Butter
Cooked ham (I used leftover thick cut ham from Christmas)
Dijon mustard
Grated Gruyere cheese (Swiss would work too)
Salt and Pepper

Serves 2

What you need to do....

Place the sliced bread under a broiler and toast one of the sides. Remove from the oven and butter the non-toasted side.

Place a slice of ham on each piece of bread, top with some mustard and cheese.

Put back in the oven and broil again until the cheese is melted. Top with salt and pepper.

That's it and it tastes so good! Enjoy!


Wednesday, January 2, 2013

I'm cooking again & what I ate on New Year's Eve!


AddThis Social Bookmark Button

Hello Everyone! I am back and it feels great to be cooking again! I took a much needed break and by no means am I able to cook every night like I did pre-baby, but at least I am able to get in the kitchen again every once in awhile.

For Christmas, I got Ina Garten's new cookbook, Barefoot Contessa, Foolproof - Recipes You Can Trust. Here is a link in case you are interested in getting one yourself, http://www.amazon.com/Barefoot-Contessa-Foolproof-Recipes-Trust/dp/0307464873/ref=sr_1_1?ie=UTF8&qid=1357149032&sr=8-1&keywords=ina+garten+foolproof. I love Ina Garten's recipes and this cookbook did not disappoint!

I stayed in for New Years Eve this year and I decided that I was going to make dinner and use recipes from my new cookbook. I made salmon & melting cherry tomatoes with green beans gremolata. Doesn't that sound delicious? Well it was!

Here is the recipe for the salmon...

The recipe below is to serve 4, but I when I made it, I halved the recipe. I used 2 - 6 oz. pieces of salmon.

Olive oil
1 cup chopped sweet onion
2 tsp minced garlic
2 cups (1 pint) cherry or grape tomatoes, halved
kosher salt and freshly ground black pepper
1 1/2 tbsp  balsamic vinegar
1 1/2 tbsp chopped fresh basil leaves (I used parsley instead since I bought it for the green beans too)
2 lb salmon fillet, cut crosswise into 4 pieces


Preheat the oven to 425F.

Heat 3 tbsp of the olive oil in a medium saute pan.

Add the onion and saute over medium-low heat for 5 minutes, stirring occasionally, until very tender but not browned. Add the garlic and saute for 1 more minute. Stir in the tomatoes, 1 tsp  salt and 1/2 tsp  pepper and cook over medium-low heat for 10 to 15 minutes, stirring occasionally, until the liquid evaporates and the tomato sauce thickens slightly. Off the heat, stir in the vinegar and basil or parsley.

Meanwhile, place a large cast-iron pan (or any pan that can go in the oven ) over high heat for 5 minutes. Brush the salmon all over with olive oil, sprinkle with salt and pepper, and place it skin side up in the pan. Cook the fish for 3 to 4 minutes without moving them, until browned. Turn the salmon skin side down with a small metal spatula and transfer the pan to the oven for 8 minutes. (The salmon will not be completely cooked through.) Remove the fish to a serving platter, cover with aluminum foil, and allow to rest for 5 minutes.

Reheat the tomatoes, season to taste, and serve hot, warm or at room temperature along with the salmon.
Serves 4.

Green Bean Gremolata

I learned that Gremolata means a condiment or topping that typically consists of chopped herbs, lemon zest, and chopped garlic. I found this recipe not only in the cookbook, but on the internet too.....http://www.oprah.com/food/Green-Beans-Gremolata-Recipe-Barefoot-Contessa-Ina-Garten.

Here are some more recipes from the cookbook posted on Oprah.com, http://www.oprah.com/food/Ina-Garten-Recipes-Barefoot-Contessa-Recipes/1.

What a perfect meal for those who need to detox after the holidays or for someone like me who is trying to eat salmon (a superfood) at least once a week. Enjoy!